Don’t Be Afraid to Stretch It Out
Don’t be afraid to sew with stretch knit fabrics!
So many people I have worked with and taught really want to learn to sew with stretchy knits, but are completely afraid to try it.
I’m not really sure why this is, but I would guess it’s based on what they’ve heard about sewing knits. The word on the sewing streets is that sewing with knits is a genuine pain in the butt. I’d like to try to dispel this myth and give you two important “sewing with knits bylaws” that are going to make sewing with stretchy fabrics a breeze.
When sewing & constructing projects made from knit fabrics, the major rule is this: If the fabric stretches, the seams you sew must stretch too. If your stitching doesn’t stretch with the fabric, the seams will break as you use, bend and move in the garment or project. So – here’s how you can make sure that your stitching stretches with your sewing project.
1. Use the correct needle
I tend to be a lazy stitcher, especially when it comes to changing my needle. My rule for changing my needle is to test out the knit fabric on the needle that is on my machine first, then determine if I need to change it.
Try testing out your stitches on a swatch of the fabric you’ll be using. Some stretchy fabrics (I think it’s based on how much elastic is woven into the fabric) will work just fine with a regular sewing machine needle. You’ll see pretty quickly if it’s sewing normally and not skipping a bunch of stitches as you go. If this is the case, hooray, you should be able to use the needle that you use for all regular fabrics.
If the stitching looks funny, like it’s only stitching every 4th or 5th stitch, you’re going to need a different needle to sew the fabric you’re working with.
There are two types that can be used for knits:
Ballpoint Needle – These needles are best used for sweater-type and loosely woven knits. They have a rounded point that penetrates the fabric without catching or cutting through the yarns.
Stretch Needle – These needles are designed to prevent skipped stitches and sew through tightly knitted jersey fabrics with high Lycra content, like swimwear.
2. Use the correct stitch type and stitch length
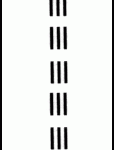
Most modern sewing machines will come with a stretch stitch.
It’s the one that looks like 3 rows of stitching next to each other.
This stitch will sew two stitches forward and one stitch back. Two stitches forward, one stitch back. Sometimes it feels like you’re not getting anywhere when you sew with this stitch. And for someone like me who’s impatient it can be torture sewing an entire project using this stitch. But believe me it’s worth it! What it’s doing by sewing back and forth, is building a stretch into the stitch so that when you’re done sewing you can pull it off the sewing machine, pull and tug at the seam and it will easily stretch with the fabric, without the seams breaking.
Word to the wise – Do you’re best not to make a mistake when sewing with the stretch stitch. It’s a doozy to seam rip! Because of all the back and forth sewing, taking this stitch out of knit fabric becomes nearly impossible, depending on the fabric you’re using. When it’s happened to me (and it’s happened plenty!) I’m way more likely to cut away the stitch than I am to seam rip and sew again. Keep in mind cutting the stitch off means also cutting away the seam allowance, making the project smaller and less likely to fit. But 9 times of out 10 it still fits because it’s stretch. Oh stretch, how I love thee!
If you’re sewing machine does not have the glorious stretch stitch, use the zigzig stitch. Set your stitch length to the narrowest zigzag setting (.5mm on many machines), and your stitch length to between 2.5mm and 3mm. If you have a very thick knit, you may need a longer stitch length. You do not need to stretch the fabric as you sew. The slight zigzag will give you the stretch needed.
Sewing with stretch – Bonus Tip
When sewing stretch fabrics, NEVER begin right at the beginning of your seam. Start in about an inch or so so the feed dogs have fabric to grab to get your started. If you try starting right at the beginning of your seam, you’ll wind up stitching in one place because the feed dogs have not fabric to get it started moving.
You’ll need to go back and sew that one inch that you didn’t sew. Just flip the project over so that the one inch where you started is at the end of the seam and you can start by sewing over the stitching that is right before it and sew all the way to the end. Make sense?
